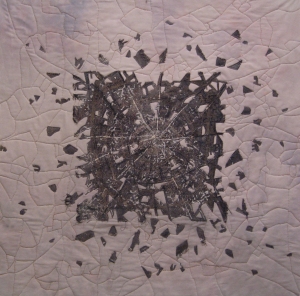
 Tangled Web #4 (c) 2010 Ayn Hanna (24"x24") Textile Painting (cotton canvas, cotton fabric hand-dyed by the artist, paint, paint sticks, metallic thread I wrote a post last month about Feeling My Way where I introduced my work-in-progress on these Tangled Web textile paintings. It’s been very intriguing to me how these pieces have evolved so I wanted to capture the story as it is happening.
First, in that earlier post, I didn’t include a photo of this image above, Tangled Web #4, primarily because I thought it was a lost cause and that I probably wasn’t going to pursue completing it and instead would just go with finishing the 3 others in the group which I had some excitement about. This poor little #4 piece was off on it’s own. I thought it was boring and flat compared to the others.
And then a funny thing happened. I think I was procrastinating about diving in to finishing the other 3 pieces (because I wasn’t sure what I wanted to do to finish them and I didn’t want to “mess them up” or perhaps ruin them by working on them without having a clear picture in mind of what I was trying to get them to be), and so, I picked #4 back up and started working with it, because hey, it was a lost cause so whatever I might do to it wasn’t going to matter…I couldn’t mess it up or ruin it because it was already a goner, right?
And so I gave myself permission, and free reign to play, and it was exhilarating and FUN! And before I knew it, I had cut it up and it became this very engaging, exciting, and energized piece which I loved! Not only that, but it became so interesting that all of a sudden as I looked at the other 3 pieces up on the design wall, THEY now started to seem less interesting and even a bit boring! Oh my gosh, what have I done?
Ok, so what just happened here?
1. I do believe that I (as we all are) am constantly changing and becoming my next self. I am not the same person today that I was yesterday, this morning, or an hour ago. What looked like an interesting (or boring) work in progress yesterday, now appears different because I am different – fascinating stuff!
2. I have a big picture plan, am practicing Law of Attraction and am very tapped into my feelings these days. I’m really concentrating on staying in touch with how I am feeling as I make my way through my day. And I’m especially tuned into noticing the things that make me feel good, fully experiencing that good feeling, and drawing more of that same stuff to me.
3. In combination with #2, I’m also trying to soothe myself into enjoying more of moving ahead without a clear picture of where I’m going. It’s a teeter-totter between the rush of excitement and adventure of a wild ride, and some hesitance because of the unknown. But what I’ve discovered here recently (and this played out for me in the course of completing Tangled Web #4), is when I Trust that what I am getting is the good stuff that I’m drawing to myself, I’m much more OK with moving ahead along the path without clearly knowing the destination. And what’s more is that I am LOVING this journey!
Don’t get me wrong – I am a major Planner, and I do have a big picture plan and I have my compass set, but I’m also really realizing how much more fun the journey is when there’s some mystery to it and it isn’t all planned out. You never know what might be around that next corner, but it’s bound to be something really cool and interesting and whatever it is, I will appreciate and embrace it because it’s what I’ve drawn to myself.
I knew on some level when I started these Tangled Web pieces that they are significant and have some importance. They emerged from within and I have been getting to know them as they are developing. It’s so interesting to me that #4 is the first one to be completed, especially since it was headed for the trash, and it causes me to see the other 3 so differently now. It’s also helped me understand and put into words what is going on with my own personal development. I know there’s more to come as I finish the others as well.
I did dive into working on #1 after finishing #4 and it is close to complete now as well (photo below). I’ll post the final image once it’s complete and write my thoughts about it once I have the words to talk about it.
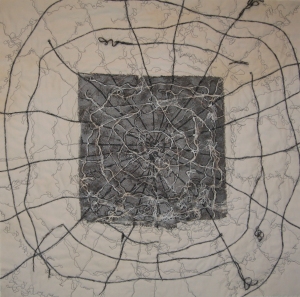 Tangled Web #1 (c) 2010 Ayn Hanna (24"x24") Textile Painting (cotton canvas, cotton fabric hand-dyed by the artist, paint, paint sticks, cotton and wool threads)
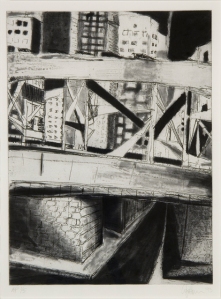 Williamsburg Bridge (c) 1993 Ayn Hanna (15 3/4" x 11 3/4") Soft Ground Etching The image above is one of 8 of my prints (etchings, a woodcut, and a collograph print) that are included in the Proof No. 1 Preview Show at Art Lab Fort Collins, on view now through end of the month in downtown Ft. Collins. It is a “preview” of a larger print show that will open in mid Sept. at the same venue.
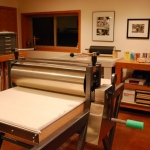
The Sept show will be interactive, with actual letterpress and other presses on hand at the gallery, along with artists who use these presses, helping patrons learn about handmade prints. Visitors will not only get to see how the prints are made, they’ll also have the opportunity to make a small print themselves to take with them as a souvenir. The show is the brainchild of Art Lab founder Dawn Putney, who envisions an exhibit and gathering of the local printmaker community coming together on an annual basis to do a show.
Although I’ve mostly been focused on textile work recently, printmaking is my first love. I did buy my own etching press before I got my long arm quilting machine. It’s so comfortable for me to turn my focus back to printmaking, like coming home in a way. You know when you’re having a conversation with someone and all of a sudden their energy just takes off and they clearly are excited and could talk for hours in detail about the topic being discussed? Yep, that’s me when the topic is printmaking.
I love black and white (well I like color too, but there’s nothing more beautiful than a gorgeous black and white etching), the process, textures and surfaces and marks that are possible, giving up some control (and letting the magic happen), and getting (some) resistance. I could go on and on. For those less familiar with handmade prints, here is a very cool interactive site from the Museum of Modern Art where you can learn all about printmaking.
Here’s another print that’s in the show:
 Last Call (c) 1990 Ayn Hanna (22" x 15 3/4") Color Reduction Woodcut This is a Reduction Woodcut. I used to be a DJ at a night club back in the day and this image captures my feelings about the club as well as incorporates some of the imagery/forms that I saw from my view of the club from the DJ booth.
The process for doing a reduction woodcut involves printing multiple colors but using only one piece of wood. It is accomplished by starting with cutting away any areas of the woodblock in which you want to appear “white” or with no color, and then you print (either by rubbing the back of the paper with a baren, or by cranking it through a clunky etching press) your lightest color (in this case that was the pink) on each sheet of paper of however many prints you want to have in your edition. Then you go back to the woodblock and cut away any areas of the plate surface in which you want that first (pink) color to appear in the image. Then you print all of your pieces of paper with the next darkest color (orange), and now you have a print with white, pink, and orange. Then you go back to the block again, and cut away the areas that you want to appear as orange in the finished print, and then print your next darkest color (red) on each sheet.
You do this cutting and printing for each successive darker color and when you’re finished, your block is “gone” and you have your edition of finished prints. When you’re done, you’re done…can’t go back and print any more of this particular image because the plate is gone.
See, told you I like process (AND printmaking)!
What topics or processes get your energy level revved up?
In my last post, I showed pictures of my fabric dyeing experiments in progress. Here are the pictures showing how the dyeing experiments turned out:
 Resist dye experiment after curing and washing Compare the above photo to the one in my earlier post of what it looked like before washing out. The end result is much lighter than what it looked like when the dye was first applied. In this instance, I applied the fixative (soda ash) to the fabric before applying the dye and then covered the fabric with plastic to let the dye cure overnight. I was hoping to allow the dye ample time to cure and fix as much of it to the fabric as possible. This experiment is a good learning for me as far as understanding how much darker the dye/fabric looks while wet and how much lighter it will be once the dye is set and the fabric rinsed out. I like the different kinds of marks that result from the various resists that I used, and I will continue to work on manipulating this piece of fabric into a finished image.
Next, here’s the result of the direct dye application experiment:
 results of painting dye directly on fabric Compare this image to what this piece looked like when it was wet and the dye first applied to it. The “wet” image is harder to see, since it is under plastic, but it too was a bit darker when wet/before being rinsed out, but the change in color is not as drastic as in the above example. On this one, I added fixative to the fabric first again, but then also added some fixative to the dye paint as well and I think this helped the fabric absorb more of the dye color in this experiment. I used the same process of covering the fabric with plastic to keep moisture in while letting the dye cure over night, and actually for a couple of days before washing it out. So, I think the combination of a)adding fixative to the dye paint and b) letting it cure for 2 days both contributed to the fabric retaining more of the dye color than the first image above. I like the results of this piece of fabric too, and have some ideas about how I’m going to use this for a next piece in my Wall Drawing series.
Of the 3 experiments, I’m really excited about my little 2 mile island resist dyeing results:
 results of "ruching" resist dye technique This involved first sewing the fabric into tubes and then applying the fixative and then wrapping the fabric around 2 PVC pipes and scrunching it down and holding it scrunched down with rubber bands. Then I painted dye on the fabric and then let it soak in dye solution for a couple days. Since the dye bath wasn’t deep enough to cover the whole piece of fabric, I also occasionally returned and re-applied more dye on the whole pieces of fabric. I really like how these turned out – they (and this technique) will be perfect to use in making more of my triathlon swim start textile paintings. I especially love the lack of control of the results and that it’s done completely with physical resists…something about that really appeals to me on a physical level.
A Bonus
One more picture to share. Here’s my sweet little brown girl Emma (I also call her “Boo” for short)! She’s an almost 5 year old Chessie/Lab mix rescue puppy that I’ve had since she was 9 weeks old.
 Emma Louise Hanna She’s my helper and my buddy and keeps a close watch on me while I’m in my studio. Mostly she’s just happy all the time (especially if there’s a ball or sock nearby), which makes me happy too and always brings my attention back to the moment and what’s important in life. I learn a lot from her. Some day I’ll probably write a post about that.
How bout you? Have you learned any bits of wisdom from your beloved animal friends? I’d love to hear about it in the comments below if you’d like to share.
 Resist dye experiment This week has been all about experiments. I feel a little like a Mad (Fabric Dye) Scientist and I’ve turned my garage into my lab. With both the Tangled Webs and the Wall Drawing series in mind, and after having done much research on direct application fabric dyeing techniques, I’m finally diving in and playing with it. I love the surprises and the unknowns and not having (much) control over the results. I also love playing with using physical resists, like rope and wire, as well as more traditional resists that can be drawn or painted on, like presist. What’s really fun about this is it combining drawing and sculpting with fabric manipulation and I like the challenge and varying effects of combining techniques.
 Direct Dyeing Experiment I’ve experimented with soaking fabric in fixative soln first and then applying the dye (with the fabric being both wet and dry before dye application). I’ve also tried adding the fixative to the dye solution itself before adding to the fabric. And I’ve combined these with various resist techniques.
 Resist dye experiment - Ruching technique I’ve even created my own little 3 mile island, trying out the “ruching” technique where, in the version of this that I am trying, you wrap fabric around a tube and then scrunch it down, hold it in the scrunched position with rubber bands and then paint dye on it, and submerge it in an immersion dye bath.
I’ll post more images to show the results of these experiments after they’re done “cooking”.
Enjoy the holiday weekend everyone!
Finding the Feeling Place
 Tangled Web #1 (in progress) (c) 2010 Ayn Hanna (24" x 24") Textile Painting (cotton canvas, hand-dyed cotton, fabric paint, paint sticks)
Time is flying by and it’s been awhile since my last post. I have been busy with multiple tasks – the day job, starting some new artwork and contemplating my creative career path, de-cluttering and making space at home – preparing for my life partner to move here in Aug, and trying to keep on a regular exercise schedule. It can be a bit overwhelming sometimes – just re-reading that last sentence gets my adrenaline going!
I’ve got lots going on in my mind-many, many thoughts, and very exhaustive, vivid dreams. There are lots of really good things happening and I’ve got some goals and plans defined. But in many ways, things are very unclear for me right now, and even though that is an uncomfortable place for me to be, I know it’s exactly where I need to be. I am smack dab in the middle of “It”, figuring “It” out, day by day.
I have some great tools, resources, and helpful guides, all of which I am calling upon to help me figure this path out. Some days it seems clear, and others, not so much. There’s a part of me that would love to be able to see (and articulate) my career plan for the next 5, or 10 years, but I’m just not there right now. So, I’m doing a lot of contemplating, asking lots of questions, and tuning into my feelings, finding what feels good and visioning more of that in my life. The rest will come eventually. This is a new approach for me, slowing down instead of speeding up, when I’m not sure of my next move, so the process is just as new and uncomfortable right now as not knowing the path. This is a grand journey!
Speaking of what feels good…. My “Wall Drawing” textile painting was selected for the “Evolutions 2010” show at the Rocky Mountain Quilt Museum, Aug 3 – Oct 30 with an opening reception on Aug 6. If you live near Golden, CO, I hope you will drop by to see the show. While completing this piece, I got some new ideas for more work with this subject matter/forms, so I’ve now started planning the next textile painting in this series. I’m excited to see how this will evolve.
New Work in Progress – Tangled Webs
While I’m planning my next piece in the Wall Drawing series, above and below are some new pieces that I already have in progress.
 Tangled Web #2 (in progress) (c) 2010 Ayn Hanna (24" x 24") Textile Painting (cotton canvas, hand-dyed cotton, fabric paint, paint sticks) I started these a few months ago. They emerged as I was doodling and day dreaming and they have been another exploration of techniques – resists, fabric paints, and paint sticks. I created the “webbed” imagery through application of multiple layers of resists (both painted on and physical objects laid on) and fabric paints as well as paint sticks. I didn’t take any in-process photos as I was too wrapped up in “the doing” and forgot to, but I think I’ll have more opportunity to do so in the future because this technique seemed so natural to me, I’m sure I’ll be doing more with it. I like the contrast of the rich textured dark painted/resisted web drawings with the subtle light valued, airy border fabric which are pieces of my own hand-dyed fabric.
 Tangled Web #3 (in progress) (c) Ayn Hanna (24" x 24") Textile Painting (cotton canvas, hand-dyed cotton, fabric paint, paint sticks) With these pieces especially, I am discovering that the imagery and “feel” or idea I have of my emerging subject matter seems to drive the techniques for realization of the finished work. Each piece becomes what it needs to be. These are all works in progress, and I’m not really ready to talk much about them yet (I’m still working through my own understanding of them), but they are very intriguing to me, and have some importance. I guess they are in some ways a parallel to what I’m feeling with my career right now too. I have many questions that I am contemplating right now and I am feeling my way to discovering my next self.
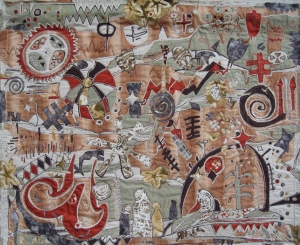 Wall Drawing (c) 2010 Ayn Hanna (36" x 44") Textile Painting (cotton fabric, cotton thread) Finally finished this textile painting and am happy with the results. It’s been a great learning process – figuring my way through merging the processes that I’ve used in my woodcut printmaking with the way that I’m working in textiles. It’s been a good way to approach the textile medium and be able to still express a sense of drawing and showing the artist’s hand, which is much more important to me than achieving a “slick” finished product. I’ve still got more things to explore within this general technique, so I plan to do more work and continue to explore this subject matter and technique to see where it leads me next. Below are some detail images of this first “Wall Drawing” in the series.
 Wall Drawing, detail  Wall Drawing, detail  Wall Drawing, detail Now that this one is complete, I’m on to other pieces, working on a few pieces that I had started on awhile back and finally am ready to re-engage on completing them. Working back into these to finish off all these pieces that I had previously began is a great sense of continuity, growth, and satisfaction all rolled into one.

It’s been a very busy week between the day job, triathlon training, and competing in my first triathlon event of this season. It’s good to have done the local event – Pelican Fest Triathlon although it took me a couple days to recover.
I am a bit of a sports freak and love keeping up to date with lots of the professional leagues. So, I’ve been watching the Stanley Cup Playoffs this week (go Blackhawks!) and as I’m not one to “waste time” watching TV, I did these 2 drawings during game 4 on Friday night. I’m not sure what they’re about, mostly they are just automatic drawings that I did on transparencies because my plan is to use them for stencils and make silkscreen images of them for printing patterns on my hand-dyed fabrics. When I do eventually get the screens made and printed, I’ll post those images here too so you can see how they turn out.

Still working on finishing my Wall Drawing textile painting, hopefully today, so I’m off to the studio now to get busy!
 Dyed fabric, rinsed and ready for more washing. This past weekend we finally had our first 80 degree day so I decided to take advantage of the warm weather and dye some fabric. Mostly I just needed a non-verbal day to relax and be by myself, with no pressure of deadlines or deliverables and I was just really wanting to play with color. I have some ideas about new textile paintings I want to start, but I needed some play time and this was my answer.
I used the low water immersion dyeing process, loosely following the process Ann Johnston describes in her book, Color by Accident. My friend Lisa Call taught me her version of this process last summer so now I’m trying out what I learned from Lisa on my own and will eventually pass on what I’ve learned to other artists as well. I love our artists’ community of learning and teaching each other new things.
 Concentrated dye solution ready to go. I like this process because, even though you can start with a general idea of colors that you want to achieve, you never know quite what colors you’ll end up with (unless you are a control freak and painstakingly measure and write down all your dye recipes, which I have no interest in doing). This makes it fun and interesting. It also virtually guarantees that you’ll never get the same exact fabric color twice. This appeals to me much the same way as making original art does and reminds me of something I was taught in a beginning painting class years ago – that it is preferable each time you put your brush back to the palette, to attempt to load it with a different combination of paint. That way, you always have more interesting variation of color on your canvas, even if you’re painting a large area of a (seemingly) single color.
 1 yd pieces of dyed fabric in their tubs. By layering up to 3 or 4 pieces of fabric in each tub, you end up getting a range of values of a single color, as each successive layer is lighter in value because there are less and less dye molecules left in the dye bath to be absorbed with each layer of fabric added. Mixing the dyes to get an interesting starting color and then watching what happens as the dyes change in color as each successive layer of fabric is added, is is a fun way to learn about color theory and dye properties. In the photo below, you can see how the layers of fabric in each tub get lighter successively.
 Low water immersion-dyed fabrics curing in their tubs. Although I had fun, I kind of forgot just how much work it is to dye 60+ yards of fabric! I’m still really glad I did it, but it turned into an all weekend and into Monday am project before I was “finished” (technically I’m not really finished, as I haven’t yet ironed all of this fabric just yet).
 60 yds of dyed fabric ready to be ironed.
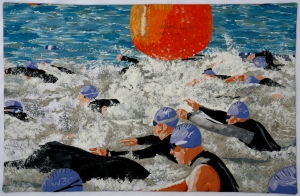 Triathlon Swim Start (c) Ayn Hanna (28"x43") Textile Painting (cotton fabric, fabric paint, cotton batting, cotton and rayon thread)
My “Triathlon Swim Start” textile painting has been juried into an online Art Quilt Show that opens today at Infinity Gallery. The show will be exhibited online through August 15th.
This piece is based on a photo of the start of my swim wave of the Boulder 5430 Sprint Triathlon. I used a fused applique process for construction, applied fabric paints, and quilted it on my long arm quilting machine. For those not familiar with the sport, triathlons include swimming, cycling, and running (in that order). The start of the race is typically broken into a handful of “waves” or groups of swimmers, based on age group/gender and the groups start “en masse” at 5 minute intervals onto the swim course. It’s the most exhilarating part of a triathlon (well, besides crossing the finish line) because this usually takes place just as the sun is rising (triathlon races start earrrrly), you’re standing in very cold water with a bunch of other somewhat nervous people that are all hyped up on pre-race nutrients, knowing that when the horn sounds you’ll be thrashing your way through a race start that invariably will include getting kicked, punched, knocked around and swam over by some faster, stronger swimmers. Sounds like fun, no?
While I’ve always loved sports, I’ve only been doing triathlons for the past few years. I train in northern CO with a fun bunch of teammates at the Windsor Triathlon Club. It takes a pretty substantial commitment of both time and energy to prepare for triathlon races and finding the time for training to race in 3 different sports can be a challenge sometimes. The bike is definitely my strong suit – I’m a pretty good cyclist and love to ride. The swim and the run are more challenging for me. While I do like to swim, I’m pretty slow and in my opinion, the best thing about the swim is that I get to get on my bike and ride once the swim is done.
My first triathlon of the 2010 season is coming up in just a couple weeks – the Pelican Fest Triathlon in Windsor, CO. It’s a fun early season local sprint distance triathlon (Swim ½ mile, Bike 10 miles, Run 3.1 miles). I am hoping for some sun and warmer weather to arrive before race day on May 29!
I find it’s really important to have clear goals and plans to keep me on track with the many important interests that I’m pursuing. Juggling my day job, family relationships, self care, and art career are challenging enough even with an organized plan. It would be total chaos without one.
Recently, I participated in one of Christina Merkley’s “Shift-It” group training sessions which really helped me gain clarity on where I’m headed and develop an organized plan to get there, across multiple facets of my life. (I highly recommend the Shift-It program for anyone who really wants to make a change to their current situation and would like some help in clearly defining goals, plans, and ways to break through their own resistance.) Through the Shift-It course, I first developed my Goals, then developed a Big Picture Plan which had 3 top level action areas in support of reaching those goals, and then for each of these Big actions, I created a Take Action Plan which includes the smaller tasks required to achieve the Big actions.
Below is a picture of my Take Action Plan. It’s comprised of multiple sticky notes, each with a specific task. It’s also a pretty dynamic plan, because I am constantly completing tasks and removing them from the wall and just as quickly, coming up with new tasks to add to take their place. It’s all linked together, so I know that by working on completing the small tasks, I’m always making progress and headed in the direction of my ultimate goals. It’s my anchor and compass, to get me where I want to be.
 My "dynamic" Take Action Plan Developing an Art Career
One of the action areas of my plan, in support of developing my art career, is to establish an exhibition record. One of the tasks associated with that is to identify a list of potential juried shows to consider entering, noting their entry guidelines, and putting the entry due dates on the calendar. Getting this information captured and then noted on the calendar really helps me to structure my plans and adds a nice incentive (i.e. “deadline looming”) to help me get pieces done. Here’s a photo of my list of potential shows to enter for 2010.

I won’t be entering all of these shows (my goal is 2-3 this year), but having this list helps me map out and manage how I’ll focus and spend my studio time throughout the year.
What big goals do you have for your art career this year and what tools and processes do you use to keep yourself on track?
|
|


